- Casting your Android screen to Windows is easy and lets you share photos, and stream videos or games on the big screen.
- You can use methods like the built-in feature, a third-party app like AirDroid Cast, or a wired tool like Scrcpy, which offers a variety of options depending on your device and needs.
Have you ever looked at your Android screen and thought, “I wish I could make this bigger”? Casting your Android screen to a Windows PC makes that possible. Whether you want to share photos, stream videos, play games on a bigger screen, or present work ideas, this guide will help you cast your Android screen easily.
In this article, you will find all the working methods that can be used for casting Android screens to Windows. With these methods, you will easily cast your Android screen on your windows.
Also, Read How To Lock / Encrypt Drive With Password in Windows
What Does Casting Mean?
Casting means that you mirror your Android screen to a larger device, for example, a TV or PC. This way, you can view everything from your phone – be it an app, photo, video or game, but shown on a larger screen.
It is a bit like mirroring the screen of your phone in real time, so whatever you do on your phone will appear immediately on the PC. For example, you can play a video on your phone and see it play on your Windows PC.
What You’ll Need
- Android Device: Running at least Android 5.0 (Lollipop).
- Windows PC: Ideally with Windows 10 or 11 for smoother compatibility.
- Stable Wi-Fi Connection: Both devices should be on the same network.
- Apps/Tools: Free apps like Windows Connect, Google Home, or third-party apps like Scrcpy.
How To Cast Your Android Screen To Windows
Casting your Android screen to a Windows PC is the easiest way to view your favourite apps, videos, or games on a larger display. Just follow these methods to mirror your Android screen to Windows without any hassle.
Method 1: Using the Built-In Wireless Display Feature
If you’re using Windows 10 or Windows 11, you don’t need to download extra apps on your Android phone to mirror its screen to your PC. These versions of Windows already have a built-in feature that allows Android and Windows phones to project their screens onto a Windows computer.
Step 1: Setup your PC
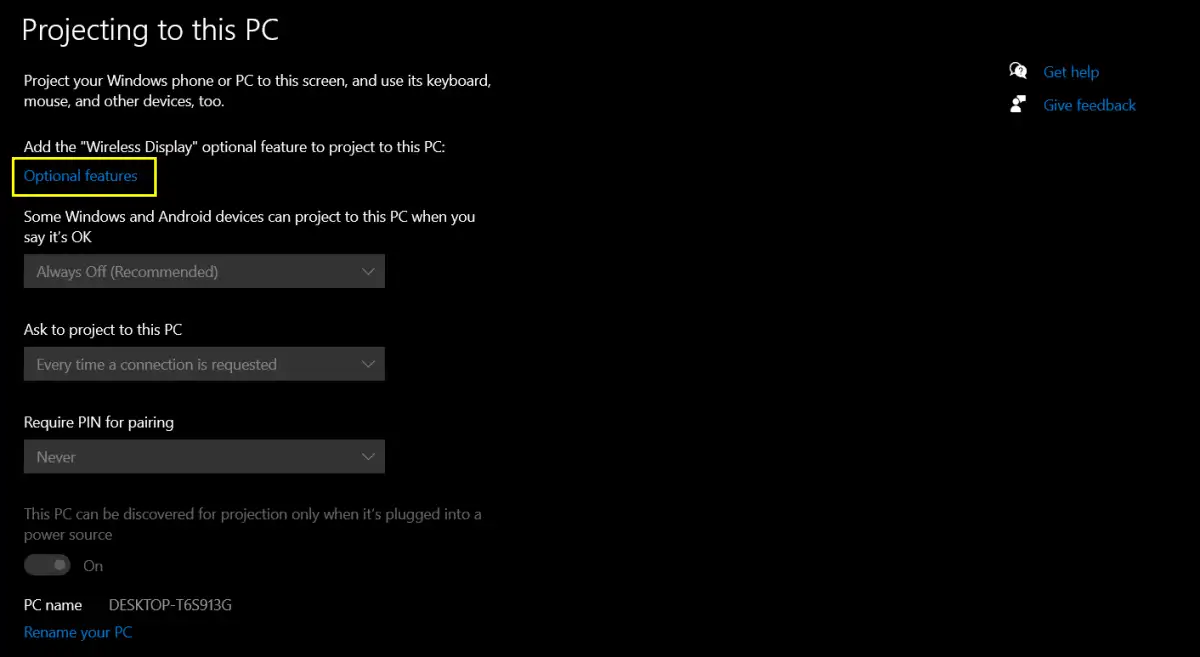
1. On your PC, type “Projection Setting” in the search bar and open it. If it’s not installed, you may need to add the “Wireless Display” feature through Windows’s optional features.
2. To add the Wireless Display feature, click on the Optional Feature. Or, you can search for “optional features” in the Windows search bar.
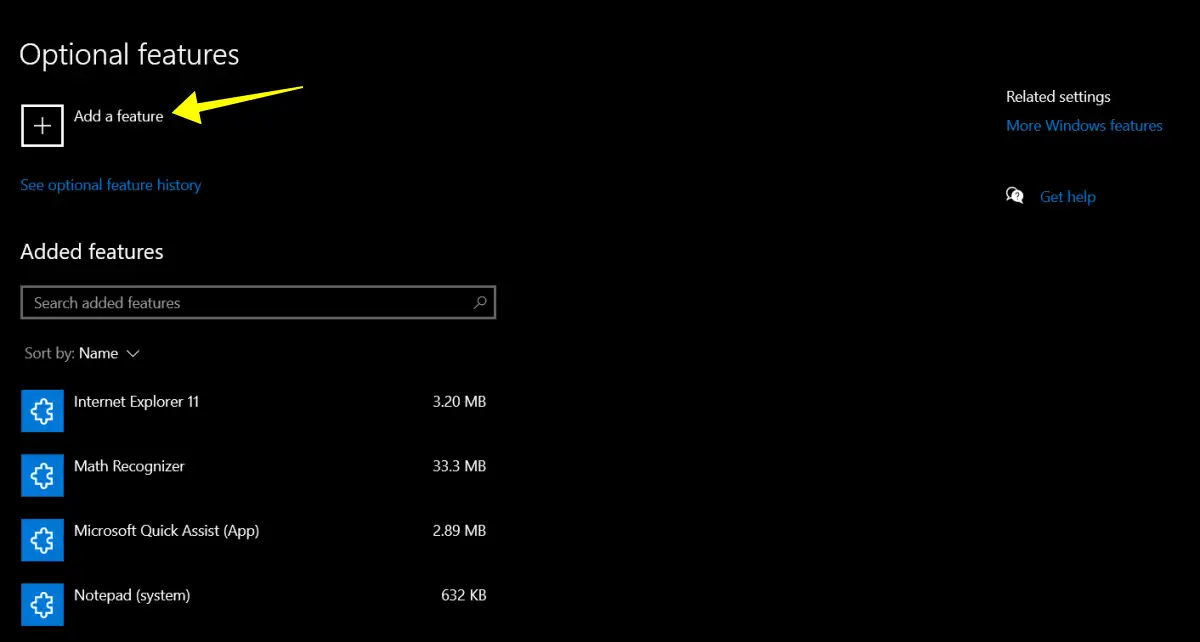
3. In the Optional Feature option, click on “Add a Feature”.
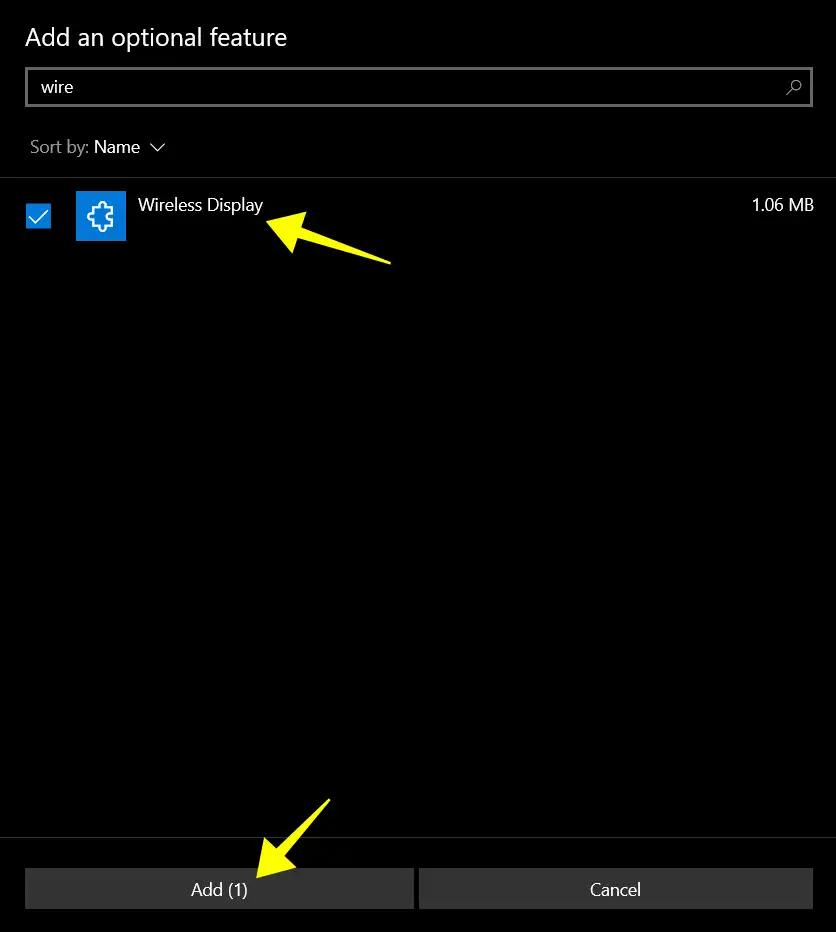
4. Next, search for “Wireless Display,” check it, and click the “Add” button.
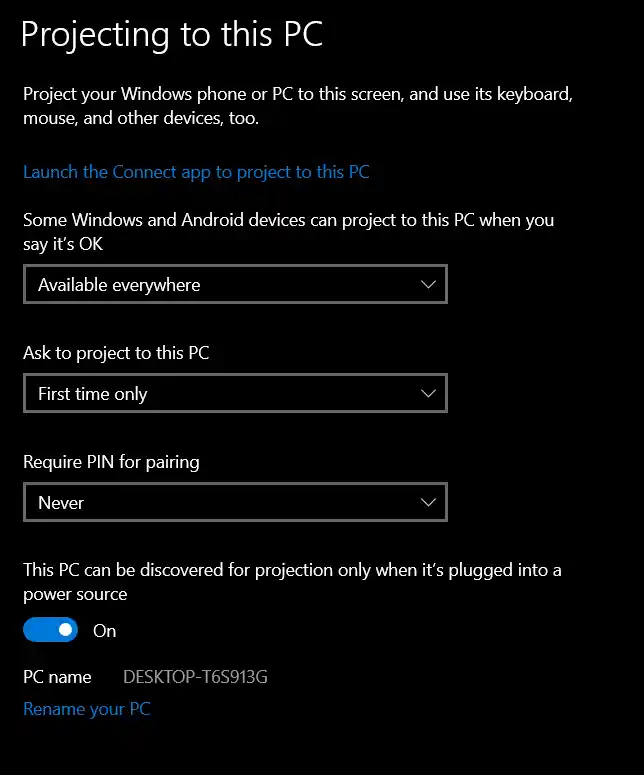
5. Once it’s added, open the Start menu and search for “Projection.” Then, open the Projection Settings.
6. Now, adjust the setting as shown in the image. You can also set up a PIN if you wish.
Step 2: Enable Casting on Android
1. On your Android device, swipe down from the top to open Quick Settings.
2. Since each Android device and version may vary, look for options like “Cast Screen,” “Mirroring,” or “Smart View.” Tap on it.
3. Then, it will start scanning for the available devices. Your PC should appear on the list of available devices. Tap it to start mirroring.
4. On your PC, approve the connection request.
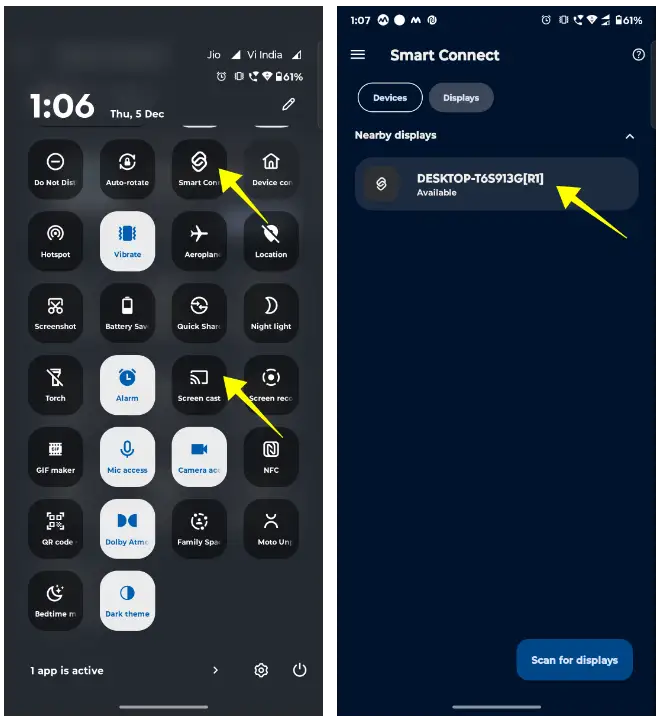
Note: The quality of the cast depends on your Wi-Fi strength. Once, while streaming a video, I noticed lag when using my home router, but switching to a 5GHz network solved the problem.
Method 2: Using a Third-Party App
When built-in features fall short, third-party apps come to the rescue. There are many apps available on the Play Store like Vysor, and Microsoft Connect app but my favourite app is AirDroid Cast, which works seamlessly.
1. First of all, download and install AirdroidCast on your PC and Android device using the download button below.
2. Then, Open AirDroid Cast on both devices. You can connect via QR code, casting code, or USB.
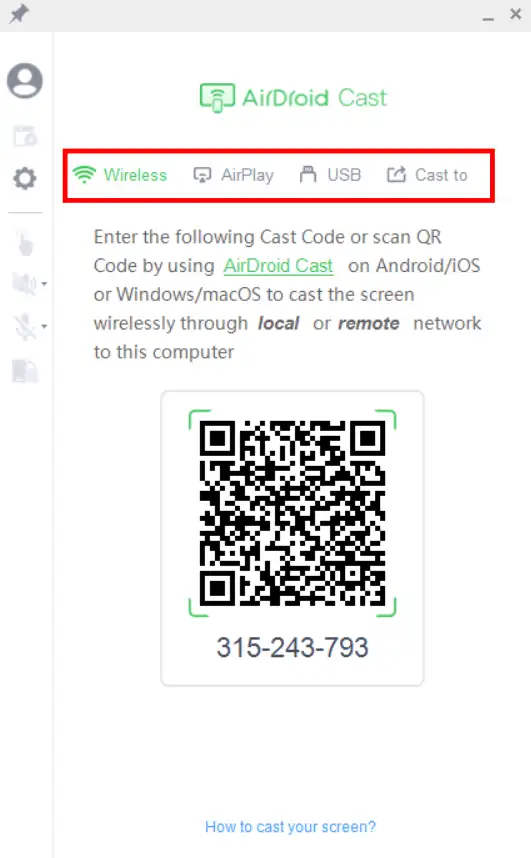
3. On your Android phone, scan the code provided in the Windows AirDroid Cast application. Then, click Allow to approve the connection.
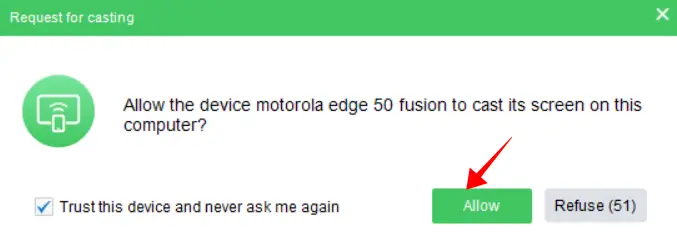
Unlike other apps, this app works on older devices and provides a stable connection. I used it to display gaming walkthroughs during a live stream and loved how smooth it was.
Method 3: Using a USB Cable and Scrcpy
If you prefer a wired connection, Scrcpy is a fantastic open-source tool. This is a great option for people who don’t mind installing extra software.
1. First of all, Visit the Scrcpy GitHub page and download the latest version of the tool.
2. Next, Enable USB Debugging on your Android phone. To do so, go to Phone settings > About Phone and tap Build Number seven times to unlock Developer Options.
3. Then, enable USB Debugging in Developer Options.
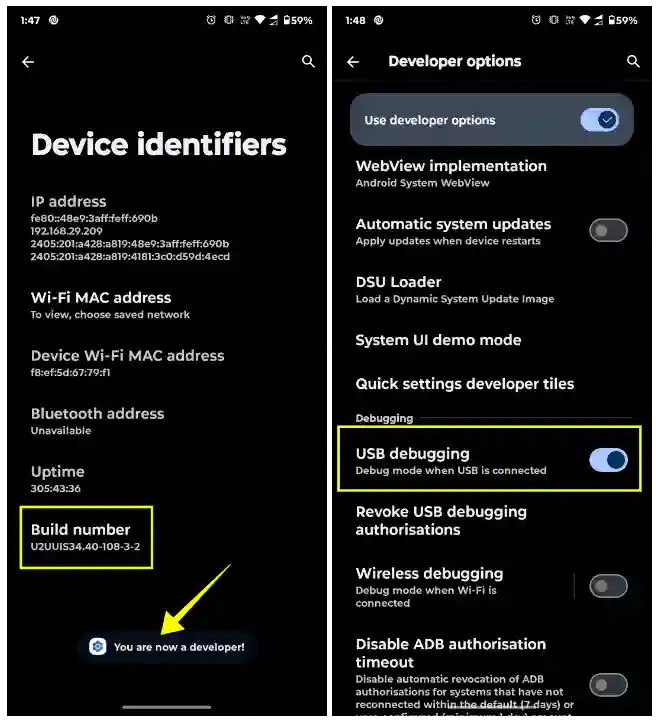
4. Now connect your phone to your PC via a USB cable. Then, open Scrcpy on your PC.
5. It should detect your phone automatically and your Android screen will appear on your Windows PC instantly.
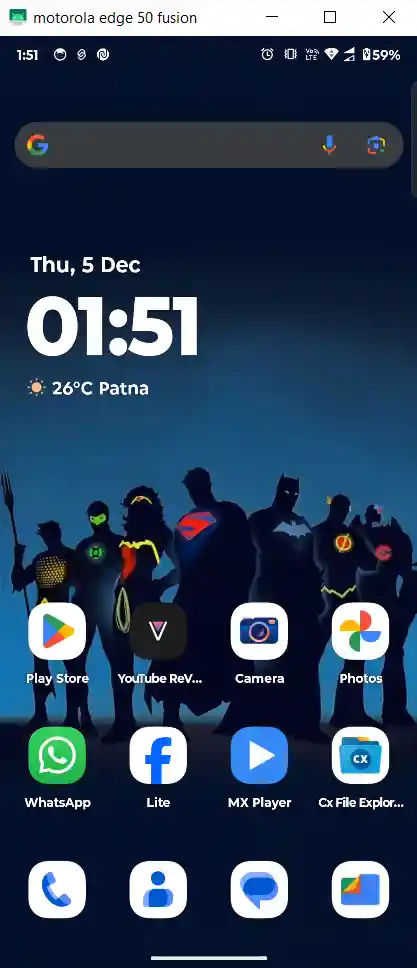
Scrcpy is fast, has no ads, and lets you control your phone using your PC’s mouse and keyboard. I’ve used this method for creating Android tutorials, it’s a lifesaver.
Tips for a Better Casting Experience
- Strong Wi-Fi is Key: For wireless casting, ensure both devices are on the same strong network.
- Keep Your Devices Updated: Updates improve compatibility and fix bugs.
- Experiment with Apps: Tools like Vysor and LetsView offer unique features worth exploring.
Casting your Android screen to Windows is easier than you think. Whether you want to share memories with your family or do some work on a project, the methods mentioned above will help you get going. I personally use Scrcpy because it is flexible. But each method has its own advantages.
FAQs
Why doesn’t my phone show the Cast button?
Maybe your phone doesn’t support casting, or the option is hidden within Connected devices in Settings.
Do all Windows PCs support screen casting?
No, not all PCs have Miracast. Check by searching for “connect” in Windows and see if your PC supports it.
Does casting affect the performance of a mobile device?
Casting can take up some resources, but modern phones handle it well. Problems like lag usually arise from network issues.
Can I control my Android device from my PC while casting?
Yes, apps like Scrcpy let you control your phone using your PC’s keyboard and mouse.
Why does my screen lag while casting?
Usually, screen lag is caused by poor Wi-Fi connectivity. Try a different network—switching to 5GHz would be advisable or use a USB connection for lag-free casting.
Nice Article ♥