The Windows key, that button with the Windows logo, is an important key of any Windows operating system. Pressing the Windows button instantly opens any program from the Start menu. But what happens when it stops working?
You are left in confusion and frustration. But, don’t worry, in this article, I will give you 7 ways to fix the Windows key not working problem. Pressing the Windows button opens any program from the Start menu instantly.
But for some users, whenever they press the Windows key on a laptop, it does not do its job of bringing up the Start menu. This means that the Windows key is not working. So, follow the steps below to fix this problem.
Causes Of Windows Key Not Working Issue?
- Windows 10 Game Mode Conflicts with your keyboard
- The Windows Key Has Been Disabled
- Your Keyboard Is Damaged Or Broken
- A New Windows 10/11 Update Is Rolled Out That Causes Break Things On Your PC Functions.
- Bad drivers, incompatible drivers, or old drivers can also cause your keyboard to stop your Windows key
- Windows key is disabled within the Windows OS registry editor
How To Fix Windows Key Not Working Issue
Before Executing any Method it’s best to restart your computer first. This procedure refreshes the operating system and removes any corrupt temporary data that could be generating the Windows Key Not Working.
If Restarting The System Doesn’t Work Then Follow My Below Methods For Solving Your Issue.
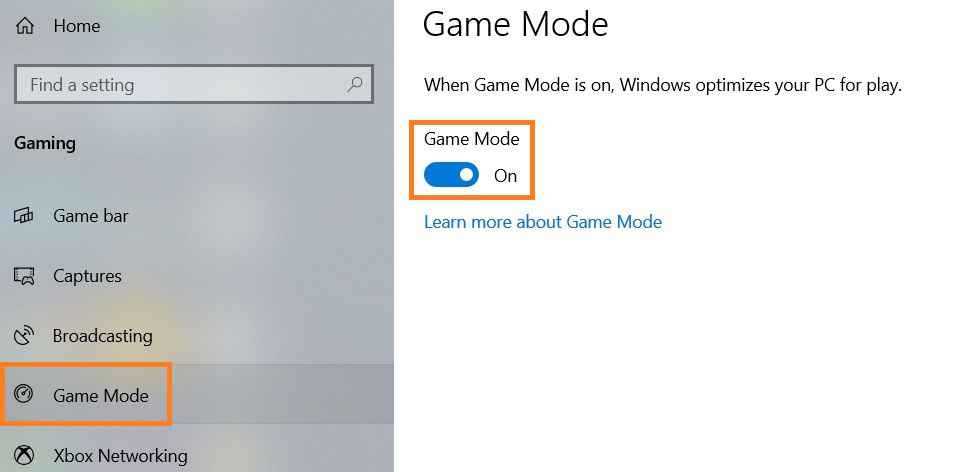
Method 1:- Disabling Game Mode In Windows
Microsoft offers many features and the Game Mode feature is one of them. Yet, the Game Mode is not perfect. Users have reported that it causes conflicts with their keyboards, making the Windows Key Not Work in return.
You can easily turn it off with our quick guide to check whether or not it causes any problems.
1. Press on the Start menu in your taskbar (Windows icon) and choose Settings or you can use the Windows + I keyboard shortcut.
2. Choose “Gaming Option” from the available menu options.

3. Click the “Game Mode” tab using the menu in the left panel.
4. Ensure that the toggle under “Game Mode” is set to “Off.”
Method 2:- Using Registry Edit
According to users, if there’s a problem with your registry, you should be able to solve this issue simply by modifying your registry. Follow All the Steps below To Solve Your issue.
Note: Casually modifying the registry can lead to severe issues so only edit those files which are shown below and do not edit any other file.
1. Press the Windows + R keys on your keyboard to open Run, then type “Regedit” into the field. Click the OK button to launch the Registry Editor
2. On your left, You can navigate the Registry Editor by extending folders using the arrow icon next to their names and navigating to the following key:
HKEY_LOCAL_MACHINESYSTEMCurrentControlSetControlKeyboard Layout
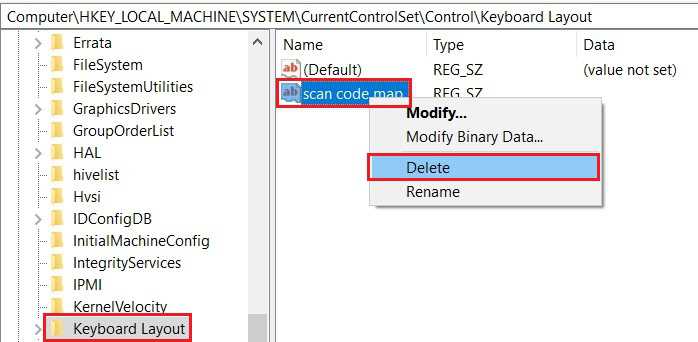
3. Press Yes on the confirmation/warning message.
4. After deleting “Scancode Map,” close the Registry Editor and restart your computer. This Will Solve Your Issue.
Method 3:- Update keyboard Drivers
Windows Key Not Working problem can also be due to outdated keyboard drivers. Updating the keyboard driver can solve this problem. Follow these steps to update your Keyboard drivers.
1. Hold CTRL, Alt, and Delete together and select the Task Manager option. In the Task Manager, select to run a new task from the file menu.
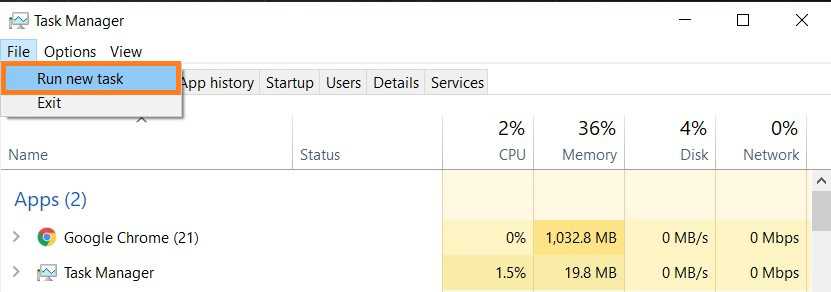
2. Type “devmgmt.msc” into the text box and hit Enter. It will open the Device Manager.
3. Search your Keyboard in the Devices list. Right-click on it and select Update Driver.
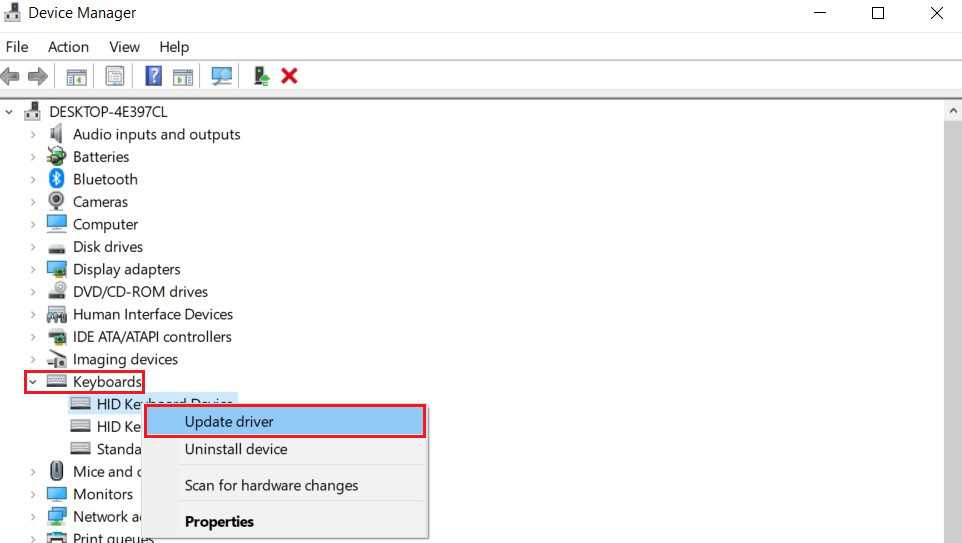
4. Click On search automatically for the updated driver, it will look for your driver on the internet and show it to you.
5. Download and install the driver update. It Will Help You To Solve Your Problem.
Method 4:- Re-register all apps using the PowerShell command
A few users informed us that they managed to solve the Windows Key Not Working problem simply by using one PowerShell command.
If you’re not well-known with PowerShell, it’s a great command-line tool that allows you to remove any conflicts between Windows 10 components.
1. Click On the Windows button Type ‘PowerShell’ and then right-click on ‘Windows PowerShell’ and click Run as an administrator.
2. Or, If the Windows key Not Working Then You can go to this location: C:\Users\YourUserName\AppData\Roaming\Microsoft\Windows\Start Menu\Programs\Windows PowerShell\ and right-click on “Windows PowerShell” and run as administrator
3. After OpenShell Opens Type or copy the script below into the PowerShell window and press enter.
Get-AppXPackage -AllUsers | Foreach {Add-AppxPackage -DisableDevelopmentMode -Register “$($_.InstallLocation)\AppXManifest.xml”}

4. After the command has finished running, restart your PC, Now Your Windows Key Not Working problem has been solved, you should be ready to use the Windows key once again.
Method 5:- Create a new user account
An impressive easy solution you can try to resolve issues is making a new user account. If everything works excellently on the new user, simply transfer your files over and start using the new account. To do so, Follow These Steps.
1. Click on the Start menu and choose “Settings.”
2. Navigate and click on the “Accounts” Section
3. Click On the Family & Other People section on the left side.
4. Scroll down and click on the “Add someone else to this PC” option.
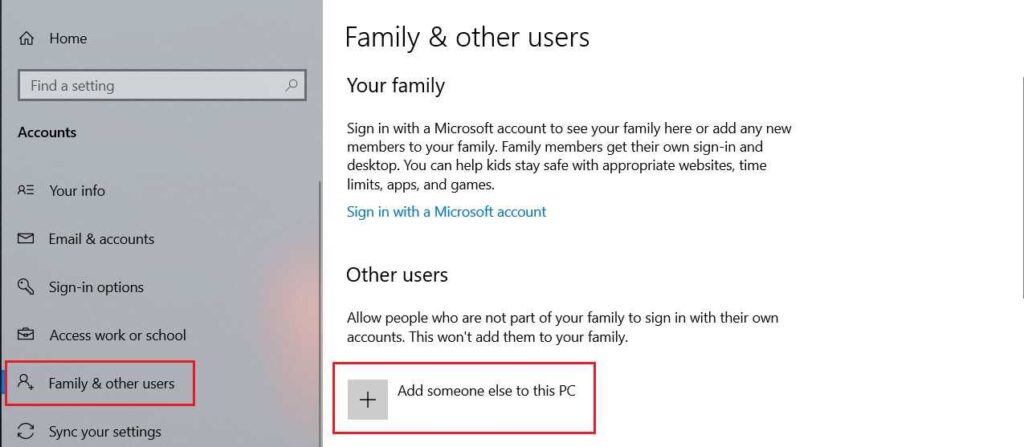
5. Rather than signing in to a Microsoft account, click on the “I don’t have this person’s sign-in information” link
6. Next, click on “Add a user without a Microsoft account”.
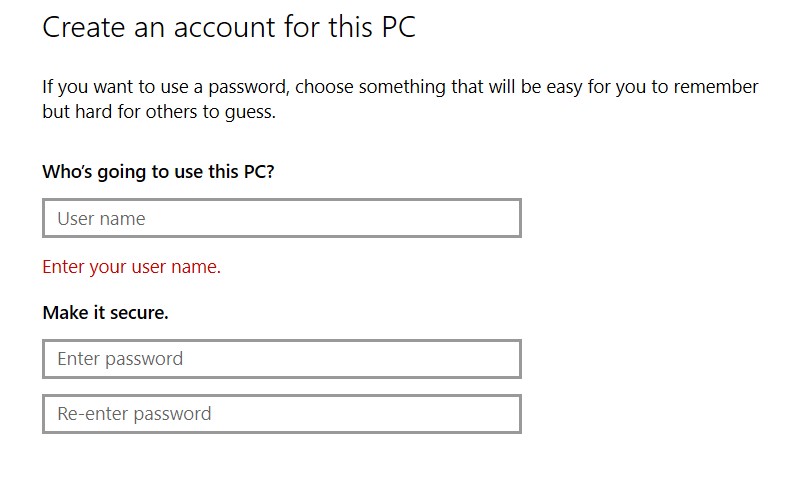
7. Type in a username and optionally a password, then click Next to complete the process.
After creating a new user account, sign out of your account and switch to a new one. Check if the Windows key works without any issues. If there is no issue with the Windows Key Not Working on a new account, it means that the software is making this issue.
Now you just need to move your personal files to a new account and use it as your main account.
Also, Read How To Solve the “Failed To Obtain IP Address” Error
Method 6:- Enable the start menu
In some cases where your start key does not begin up the start menu, there is a chance the start menu was disabled. To enable it, follow the steps below To Fix The Windows Key Not Working.
1. Right-click on the Start Button and select Run or press Ctrl + Shift + Esc and go to File and click Run a new task from the task manager.
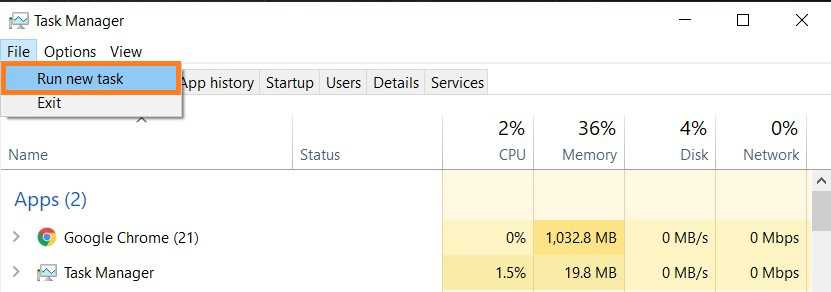
2. Type Regedit. After Regedit opens Navigate to this key.
HKEY_CURRENT_USER > Software > Microsoft > Windows > CurrentVersion > Explorer > Advance
3. Right-click on the right-hand side of the panel and create a new DWORD (32-bit) value “EnableXamlStartMenu”.
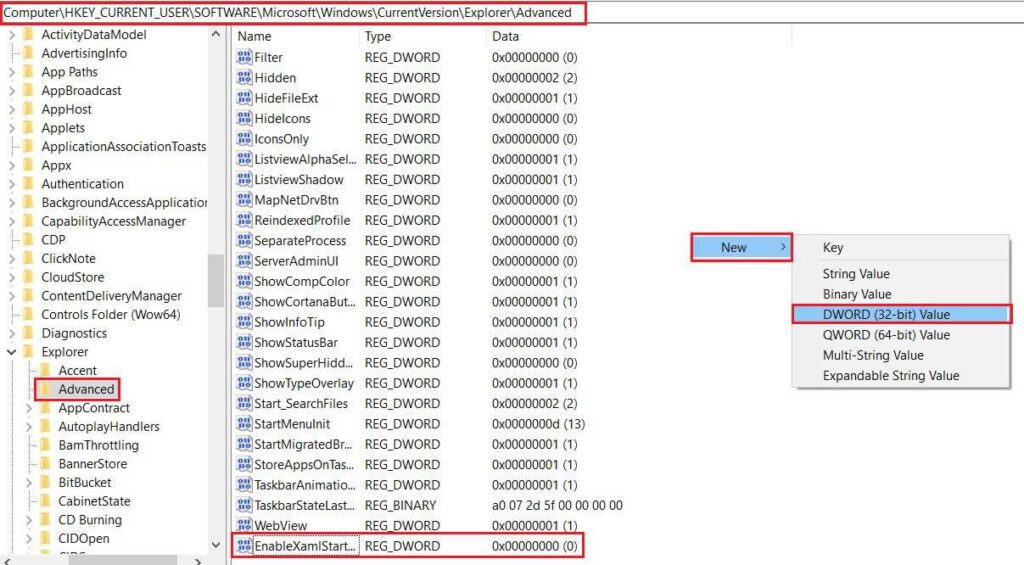
4. Restart your PC And Your issue has Gone.
Method 7:- Turn off filter keys
Turning on filter keys slows down repeated keystrokes and sets repeat rates. Anyhow, the Windows key has also Created Some issues on some keyboards like the Windows Key Not Working. To turn off filter keys follow these steps.
1. Right-click on your start menu and select settings.
2. From the Windows settings, Search and click on Ease of Access.

3. Click on the keyboard tab on the left-hand panel.
4. Scroll down and search for ‘filter keys’ and turn it off.

Conclusion
I hope that this guide was able to help you Fix the Windows Key Not Working Issue and gets in working condition again. If nothing works, I suggest applying to either Microsoft’s customer support team or looking for an IT expert in regard to your PC’s health.
People Asked Questions
Q1. How do I enable the Windows key?
Ans:- Others have a gaming mode key above F4, click the button to switch between gaming and standard modes. On some keyboards, near the right Ctrl button, rather than a second Windows button, there is a “Win Lock” button (not the menu button). Click it to enable the Windows key
